Discover the benefits of Meditating with the help of ABC of Meditation, your all-out source of information about Meditation and personal development. This site covers a wide range of topics about Basics and Background, Postures, and other important aspects. Learn what this practice is all about through our Info section, News Desk, and Equipment and Props Shop. You can also visit our Holidays and Travel Services portal and our Community. Start your discovery here and know what this site has in store for you: |  |
Showing posts with label yogasanas. Show all posts
Showing posts with label yogasanas. Show all posts
Wednesday, July 13, 2011

Tuesday, July 12, 2011
Yoga Breathing (Pranayama) - What is Yoga Breathing?
 Yoga breathing, or Pranayama, is the science of breath control. It consists of series of exercises especially intended to meet the body's needs and keep it in vibrant health. Pranayama comes from the following words:
- Prana - "life force" or "life energy"
- Yama - "discipline" or "control"
- Ayama - "expansion", "non-restraint", or "extension"
In our respiration process, we breathe in or inhale oxygen into our body, going through our body systems in a form of energy to charge our different body parts. Then we exhale carbon dioxide and take away all toxic wastes from our body. Through the practice of Pranayama, the balance of oxygen and carbon dioxide is attained. Absorbing prana through breath control links our body, mind, and spirit.
But life is full of stress. Because of the daily work, family, or financial pressures, we tend to ignore our breathing. Thus, it tends to be fast and shallow. The use of only a fraction of your lungs results to lack of oxygen and may lead to different complications. Heart diseases, sleep disorders, and fatigue are some of the effects of oxygen starvation. Therefore, the negative energy of being restless and troublesome leads to lesser prana inside the body. By practicing deep and systematic breathing through Pranayama, we reenergize our body.
These are the four stages of Pranayama:
- Arambha - the commencement stage wherein the person's interest in Pranayama is awakened
- Ghata - the stage where the three sariras merge to envelope the soul. The three sariras are gross, subtle, and causal.
- Parichay- the stage where the yogi experiences the knowledge of Pranayama
- Nispatti- the stage where the yogi goes beyond his physical body, and unites with the supreme
Benefits of Pranayama
Breathing is a normal part of our life, though we fail to pay attention to it. It is an autonomic function of the body that we perform even without concentrating on it. Why then do we have to learn yoga breathing? Here are some reasons why Pranayama is important:- Pranayama teaches us the proper way to breathe. We became used to breathing from our chest, using only a fraction of the lungs, not knowing that this unhealthy and unnatural way of inhaling may lead to several complications. With yoga breathing, we increase the capacity of our lungs, bringing more oxygen supply to the body to function well. We learn how to breathe slowly and deeply - the right way.
- Pranayama reduces the toxins and body wastes from within our body. It prevents one from acquiring diseases.
- Pranayama helps in one's digestion. With the proper way of breathing, one's metabolism and health condition will start to improve.
- Pranayama develops our concentration and focus. It fights away stress and relaxes the body. Controlling one's breathing also results to serenity and peace of mind.
- Pranayama offers a better self-control. Through concentration, one can better handle temper and reactions. Mind can function clearly, avoiding arguments and wrong decisions. Moreover, self-control also involves control over one's physical body.
- Pranayama leads to spiritual journey through a relaxed body and mind.
However, Pranayama should not be forced and done without proper preparation, or it may lead to nervous breakdowns. It is part of a process in yoga. Breath control is a spiritual practice of cleansing the mind and body which should be done appropriately and with proper guidance and preparation.
SHAVA ASANA (THE CORPSE POSE)
Shava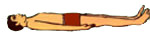 Asana means the posture of a dead body. Also called 'Yoga Nidra' or Yogic method of sleep. It is one of the most valued and highly desired asanas of the yoga system. This asana necessitates the relaxed condition of both the body and the mind.
 Bring the head back to the centre and focus the mind on the breath.
How to do :
- Lie flat on your back with your eyes closed. Keep the whole body loose and the palms on the floor or upward. Breathe normally.
- Now relax your whole body. Simple methods for relaxing different parts of the body are explained below :
For the Eyes : Open and close the eyes alternately for 10 seconds each. Repeat for about 3 to 4 times. Slowly exercise your eyes by looking up, down and straight and then towards the left, right and straight. Repeat this exercise 2 or 3 times.
For the Mouth & Tongue : Open the mouth widely without straining. Fold the tongue towards the throat area. Close the mouth with the tongue in the folded position and retain for 10 seconds. Then open the mouth and bring the tongue back to the normal position. Close the mouth and repeat 2 or 3 times.
For rest of the body : Close your eyes and see mentally that the other parts of the body are relaxed. Ensure that there is no tension in your body. Make a slight movement to make sure that each part of the body become relaxed. For example, move your toes up and down or shake out the shoulders or slowly roll the head from side to side once or twice, and so on, relaxing them.- Now relax the mind. Mind can be relaxed by purposely involving it with some neutral soothing, pleasing and comforting objects. The object can be a person or a place you have liked and personally seen. Close your eyes and concentrate and feel as if you are bodily and mentally present there.
- Now focus the mind on the breath. Keep your right palm loosely on the stomach. Exhale and inhale slowly taking in as much air as you can. Continue for about 3 to 5 minutes. When you inhale there should be expansion of abdominal muscles i.e. the stomach should rise upward and when you exhale there should be contraction of the abdominal muscles i.e. the stomach should come down towards the spine. In other words, the breathing should have a rhythm.
- Remove the palm off from the stomach and put it back on the floor. Breathe normally. Relax completely as if you are going to sleep. Remain in this position for about 10 to 15 minutes.
Benefits :
Beneficial for insomnia (lack of sleep), for feeling fresh after a tiring day. This asana gives rest and relaxation for the whole body and mind.
HALASANA - (THE PLOUGH POSTURE)
Hala Asana or The Plough Posture is a valuable asana as it has some unique qualities and excellent benefits. It is an extreme forward bending exercise which promotes strength and flexibility in all the regions of the back and neck.
It can be performed in two ways; the only difference is in the position of the hands. Beginners can practice the easier one which is explained in method 1.
How to do :
Method 1
- Lie flat on the back with your body straight and stretched out. Bring the heels and toes together. Put the palms on the floor and keep them close to the body on both sides.
- Stretch out the legs and toes. Inhale and simultaneously raise both heads upwards till they come to a vertical position.
- Exhale and simultaneously start lowering the legs towards the head area. Try to touch the floor in front of the head with the toes. Go only as far as possible for you. After exhaling, keep breathing normally till the whole posture is completed. Remain in this position for about 8 seconds.
- Start returning the back to the floor. Let the back roll down on the floor inch by inch. This should be done very slowly and smoothly. Keep the legs and toes quite tight all along during the returning phase. Now you have completed one round of this posture and relax for 6 to 8 seconds.
Method 2
- Lie flat on the back with your body straight and stretched out. Bring the heels and toes together. Put the palms on the floor and keep them close to the body on both sides. Stretch out the legs and toes.
- Inhale and raise both the hands upwards in a parallel way. Take the hands backward with the back of the palms on the floor. Finish inhaling at the time the hands have touched the floor. Exhale.
- Inhale and simultaneously lift both the legs upwards to a vertical position.
- Exhale and simultaneously lower the legs towards the floor in front of the head and above the hands. Put your toes on the floor. If you cannot touch the floor with the toes, go only as far as possible. Breathe normally. Now you are in plough posture. In this position, your legs should remain straight and close to one another. Do not bend the knees and the arms, hands and palms should be parallel to one another. Remain in this position for about 10 seconds.
- The returning process should be done very gradually and in a controlled way. First return only the legs, let the hands remain on the floor. While returning the legs, let the shoulders roll back first and then the flanks, small of the backs, hip and lastly the thighs, legs and heels inch by inch. When the heels have touched the floor, lift both hands up and return them in a parallel way to the floor. Put the palms on the floor. Now you have completed one round of the best form of the plough posture. Relax for 6 to 8 seconds.
Restrictions :
Start with one round on the first day and gradually increase to a maximum of four rounds. Relax for sometime between the rounds.
If the toes do not comfortably reach the floor, keep the hand on the back supporting the back muscles until they become more flexible.
Major Benefits :
Energizes and nourishes the sexual glands and brings strength and vitality to them. It has medicinal effect for impotency and frigidity. Exercises every inch of backbone and surpasses all other asana to bring flexibility to the spine. Reduces excess weight without weakening the body. Improves the blood circulation and nourishes many of the essential internal organs. Regular practice of this asana maintains inner balance and helps to develop mental and physical poise
DHANUR ASANA (THE BOW)

Dhanur Asana gives a full backward bend to the whole of the spine and all the muscles of the back from the neck to the lower back or lumber region. Bhujanga , Locust and Dhanu forms a series of exercises beneficial to the body when practiced together. As the forward bend flexes the spine, the bow extends it.
How to do :
- Lie on your stomach with your arms stretched on both sides. Place your right or left cheek on the floor. Bend the knees, bringing the feet up. Bring the heels close to the buttock area. Reach back to hold the ankles with your hands. The knees and the ankles should be closer to one another.
- Inhale as much air as you can. Straighten up your neck and head. Holding the breath and keeping the arms straight, arch the entire body upwards. Lift the head, chest and thighs off the floor. Remain in this position for 5 to 6 seconds.
- Exhale and return to the floor smoothly. Keep holding the ankles while you return to the first position. Put the cheek back on the floor and breath normally.
- Leave the ankles and let the legs gradually return to the floor. Bring the arms and hands to the floor on both sides and relax for 6 to 8 seconds. You have completed one round of bow posture.
Note :
In this asana, all your efforts should be to give a backward pull with the legs and not a forward pull with the hands. Thus the knees remain on the floor and the only portion which is lifted and pulled upwards is the area above the abdomen, i.e. the chest and the head area.
Restrictions :
Start with two rounds on the first day and gradually to a maximum of four rounds. In the first position in case you find it difficult to hold the ankles then hold the toes.
Do not attempt the bow while pregnant, as these asana increases the pressure on the abdomen.
Benefits :
Activates and strengthen all the major and minor joints of the body. Strengthens all the abdominal muscles and organs. Develops digestive power and removes extra weight and fat from the stomach and waist areas. Enhance the elasticity of the spine. Chest, lungs and neck are strengthened and activated, benefiting people suffering from asthma and other respiratory problems. For women, it corrects menstrual and other troubles related to reproductive organs
MATSYASANA (THE FISH POSTURE)
Matsya Asana means fish posture. It is called fish, as this position fills the lungs with air, improving the ability to float in water. Matsyasana gives a backward stretch to the cervical thoracic, and lumbar regions of the spine and the chest fully. Values of certain asanas are maximised when done one after the other. This asana gives maximum benefit when performed after the Sarvanga Asana (Shoulderstand posture).
 There are two methods of doing this asana. One is folding or turning back the head and neck area combined with the lotus posture (Padma Asana). The second easier method is without the lotus posture and can be practiced by any person.
Method 1 with the Lotus Posture
How to do :
- Sit in the lotus posture, with your right foot on the left thigh and left foot on the right thigh as shown in figure. Sit erect with the knees touching the floor.
- Lie down on the floor, pull your palms backward a little and fold your elbows to support the body weight. Move one elbow at a time further to allow the whole back to come to the floor. Breath normally.
- Bring your palms underneath the hips and the buttock. At the same time fold your elbows.
- Lift the head and bend it towards the floor, so that only upper portion of the head (crown) touches the floor.
- Try to make an arch between the crown and the flank (upper area of the hip and waist) by giving a pull with your palms to the hip. In this position your body weight is resting at two points - head and the hip.
- Bring your palms to the feet and hold the toes. Now you are in the perfect fish posture. Breathe normally and remain in this position for 6 to 8 seconds.
- For returning, leave the toes and bring your palms to the hips. Fold your elbows and support the body weight on them.
- Lift the head upward, straighten the neck and put them back on the floor.
- Unfold the legs from the lotus posture and stretch them out straight. Bring your hands on the floor and relax. You have completed one round of fish posture.
Method 2 without the Lotus Posture :
- Lie on your back on the floor with your legs stretched and palms close to the body on both sides.
- Fold your legs on the knees. Bring the heels closer to the buttock. Keep the knees and heels together.
- Bring the palms underneath the hips. Fold the elbows and lift the head up from the floor. Your body weight should rest on the elbows.
- Put the crown on the floor. Try to make an arch between the crown and the flank (upper area of the hip and waist) by giving support to the elbows and the palms on the floor.
- Remain in this position for 6 to 8 seconds. Breathe normally. In this position the weight of the body rest on the head, hip and partly on the heels.
- For returning, bring your palms underneath the hip again and fold the elbows. Now lift the head upward first and bring it and the neck on to the floor.
- Bring your palms and arm back to the floor and stretch them. Now stretch out the legs and relax.
Restrictions :
Start with one round and gradually increase to 3 rounds. Do not practice more than 3 rounds.
Do not practice the 1st method unless you have perfected the lotus posture before hand. Beginners can try the second method which is easier.
Benefits :
It has corrective effects on neck and shoulder troubles. Good effects on facial tissues, correct the disorders of the spine, relieves spasms in the bronchial tubes and helps to relieve asthma and other respiratory problems
SARVANGA ASANA (THE SHOULDER STAND)
The Sarvanga Asana is one of the most treasured asanas, said to benefit the whole body. In this asana the whole body weight rests on the shoulders and the neck and upper back regions are stretched to the limit. Beginners should practice the sarvanga asana in a moderate way and gradually attempt the full posture.
How to do :
- Lie straight, on your back on the floor. Palms should be on the floor close to the body and the heels and the toes should be together.
- Inhale and raise both the legs slowly up in a vertical position (at 90o). Raising of the legs should be synchronized with the breathing.
- Exhale and again raise the legs upward from the second position. Bring both palms underneath the hips and should be used to assist in raising the body upwards. The hands should always work as a support to the body weight.
- Try to raise the body as straight as possible.
- At the final stage of this asana you will be resting on your shoulders, chin touching the chest. In this position the legs should be stiff hard and together and the toes is pointing towards the ceiling. Do not shake. Be firm and keep breathing normally.
- Remain in this position for about 30 seconds on the first day.
- For returning to the first position, first fold the legs on the knees. Your heels should be now on the thighs and above the buttock. Then slowly let the body return to the floor while the palms are supporting the body weight.
- Now stretch out the legs forwards and relax. You have completed one round of the Sarvanga Asana.
Restrictions :
This asana should be performed only once in a single session. This final position of this asana can be retained for about 30 seconds on the first day and gradually can be increased to 1 minute. Never hold this position for more than 3 minutes.
Beginners may find it difficult to perform the full sarvanga asana. They should practice in a moderate way - i.e. raise their legs upwards only as far as they can. Regular practice for a few weeks would enable them to do the full sarvanga asana.
Benefits :
Strengthens and balances the function of the thyroid which supervises the other glands, in a most effective way. As a result of the reverse blood circulation due to this asana, it brings youthfulness, strength and nourishes the inner cells, tissues and all the organs. It cures impotency, frigidity, lack of sexual power and gives vitality to the practitioner. Centralizes the blood supply in the spinal column and stretches the spine helping to keep it strong and elastic.
SALABHA ASANA (THE LOCUST POSTURE)
Salabha Asana is a reverse posture to the Cobra Posture, which gives a backward  bend to the spine. Values of certain asanas are maximised when done one after the other. Cobra posture activates the upper area while locust activates the lower waist down area of the body. So this asana gives maximum benefit when done after the cobra posture.
 Since full-locust is strenuous, it is better for the beginners to practice the half-locust posture before attempting the full-locust.
Full Locust Posture
How to do :
- Lie face down on the floor on your stomach, hands stretched backwards close to the body and the legs straight. Making fists of the hands bring them together beneath the thighs with the wrists touching.
- Inhale as much air as you can. Holding your breath make your head straight and put the chin on the floor (on a folded blanket or towel). Tighten both the legs and lift them up as high as you can. Do not bend the knees.
- Remain in the same posture for a few seconds.
- Exhale and simultaneously lower the legs slowly to the floor. Do not drop the legs. By the time the legs touch the floor you should finish exhaling. You have completed one round of a most strenuous posture. Relax.
Restrictions :
Start with three rounds on the first day. Do not practice more than four rounds. While doing the asana special attention should be given for keeping the legs tight. Do not bend or fold on the knees. In the initial stage, do not try to retain in the same position excessively. Relax for about 6 10 8 seconds between each round.
For the beginners, it is always better to practice the half-locust posture before attempting the full-locust. When you first attempt the locust, you may be disappointed to find that your feet rise only slightly from the floor. Do not be discouraged. This will improve rapidly with practice.
Half - Locust Posture
For the half locust, the position, the breathing and the body conditioning are as same as the full-locust. The only difference is that you lift one leg up at a time. Lift legs alternatively. Do not twist the hips or bend the knee. Repeat lifting 2-4 times each.
Benefits :
The locust brings flexibility to the cervical (upper back) region and strength to the lower back. Brings a rich blood supply to the spine and the whole upper area. Favourably activates the kidneys, liver and all the organs of the lower part of the body. Increases abdominal pressure, regulating intestinal function and strengthening the abdominal walls and relieves back pain.
BHUJANGA ASANA (THE COBRA POSTURE)
Bhujanga or Cobra posture is a popular asana and it is always practiced as the first in a series of backward bending movements. In this asana the spine is arched backward gently promoting flexibility.
How to do :
- Lie straight on your stomach, keeping the palms on the floor below the shoulder blades and the elbows touching the middle part of the body. Bend the head and neck backward.
- Inhale and raise the head and chest, above the naval area, upwards. Tighten the legs allover from the waist down to the toes.
- Hold your breathe and retain in the same position for about 6 seconds.
- Exhale and simultaneously lower the head towards the floor. Relax your body and rest with your right or left cheek on the floor for about 6 seconds. Now you have completed one round of bhujanga asana.
Restriction :
Start with three rounds on the first day and increase to a maximum of four rounds. Take rest for sometime between each round. As you practice, you can increase the retaining period of the position gradually from 6 seconds to 1 minute. Do not practice the cobra while pregnant, although this asana is excellent way to prepare the body for pregnancy.
Benefits :
Increases flexibility, rejuvenates spinal nerves and brings a rich blood supply to the spinal region. Activates and energizes the upper areas of the body like the chest, shoulders, neck, face and head, giving a youthful appearance. Corrects various abnormal troubles like constipation, indigestion and increases appetite.
It has some special benefits for women. Helps relieve problems of the uterus and ovaries and menstrual problems. A regular practice of this asana makes child birth easy.
Sunday, June 12, 2011
PASCHIMOTHAN ASANA (THE FORWARD BEND)
 Paschimothan asana or the forward bend gives a complete stretch to the entire back of the body, from the skull down to the heels. In Sanskrit, 'Paschim' means back and 'Uthan' means stretch. It is a simple yet powerful position to practice. The original posture is strenuous, but beginners can try out an easier version which is explained below. This Asana can be perfected only after a weeks practice.
How to do :
Restrictions :
- Sit on the floor with your legs stretched and heels together. Back, neck and head should be held straight. Bring both the hands with the palms down, parallel to the legs.
- Inhale and proceed towards the toes and try to touch them. If you cannot touch the toe, proceed only as far as they can.
- exhale and slowly bring your head down in between the hands; stretch out the hands, toes and head as far as you can. Retain for 6 seconds.
- Inhale and return to the first position. While returning the palms should touch and dragged through the legs.
Start with three rounds and practice a maximum of five rounds a day. Relax for some time between each round. This asana gives strain to the spinal code. Beginners are advised to avoid excessive strain and follow the simple method.Benefits :
Gives flexibility to the spine, restores youthfulness, and acts as a medicinal aid for back ache and stomach troubles. Strengthens the sex glands and massages all the abdominal organs.
UTTHAN PADA ASANA
 In Utthan Pada Asana, both the legs are lifted upwards. This asana gives excessive strain to the spine. In case of any spinal injury this asana can be practiced by lifting one leg at a time.
How to do :
Restrictions :
- Lie on the floor with your body straight. Heels should be together. Look towards the ceiling.
- slowly inhale and take in as much as air you can.
- Holding your breathe lift both the legs up about 10 inches high from the floor. Legs should be held together straight and toes stretch forward. Retain for about 5 seconds.
- exhale slowly and begin lowering the legs simultaneously. Complete exhaling by the time your legs are brought back to the floor.
Start with three rounds on the first day. Relax for about 5 seconds after each round. Do not practice more than four rounds a day.Benefits :
People who have had spinal injury can do the asana by lifting each leg alternatively. Do two rounds with each leg.
Strengthens the spinal code and corrects disorders of the back. Reduces paunch and removes constipation, indigestion and gas trouble.
SURYA NAMASKARA (THE SUN SALUTATION )
 | Stand erect with the head and body straight but relaxed. The feet are together, and knees are straight and the arms are relaxed at the sides. Inhale deeply and begin. |
Bring the hands up from the sides, place the palms flat against each other at the center of the chest. The elbows are pushed out of the sides. |  |
Inhale and raise the arms upwards. Inhaling and raising of hands should synchronize. By the time you have stretched your arm, you should complete inhaling. |
 | Exhale slowly bending forward, touch the ground keeping the hands parallel to the feet and head touching knees. By the time your hands touch the ground, you should complete exhaling. Retain the breathe and remain in the same position for about 6 to 8 seconds. If you cannot touch the ground, then let your hands go only as far as they can. |
Inhale and move the right leg back away from the body in a wide backward step. Keep the hands and feet firmly on the ground, with the left foot between the hands. Raise the head. |  |
 | Exhale and bring the left foot together with the right. Keep the arms straight, raise the hips and align the head with the arms. |
Inhale and slowly lower the hips to the floor, (hips should be slightly raised above the ground) and bend backward as much as possible. |  |
 | Exhale and lower the body to the floor until the feet, knees, hands, chest, and forehead are touching the ground. |
Inhale and slowly raise the head and bend backward as much as possible, bending the spine to the maximum. | |
 | Then exhale slowly and keeping the arms straight, raise the hips and align the head with the arms, forming an upward arch. |
Slowly inhale and bend the left leg at the knee taking a wide forward step. Keeping the hands firmly rooted, place the left foot on the ground between the hands. Lift the head upwards. | |
| | Exhale slowly and keeping hands firmly in place, bring the right leg forward, so that both feet are together to align them with the hands. Touch the head to the knees, if possible. |
Inhale slowly and raise the arms upward. Slowly bend backward, stretching the arms above the head. |
Return to the first position. |
Now you have completed one round of surya namaskar. Maximum of 4 rounds can be done. Once you start doing the Surya Namaskaar, make sure to continue it regularly for at least ten days to observe its beneficial effects
Subscribe to:
Posts (Atom)